9.30.2010

Zucchini à la cabbage

Zucchini à la cabbage is – according to my observation – very tasty side-dish with three benefits: 1) is not so flatulent like cabbage 2) for the preparation you usually need twice less time and 3) you can enjoy it like a main course.
Picture 170

Ingredients:

1 bigger zucchini
1/4 cup vinegar
1/4 cup water
1 tbsp sugar
1 tsp salt
1 tsp caraway seeds
1 tsp fresh chopped dill (optional – not for those who don’t like dill)
1 tbsp vegetable oil
1 bigger onion (chopped)
3 slices bacon (chopped)
1 bigger potato (fine shredded)

Directions:

1. Peel zucchini and scrape (coarse) directly into the pot.
Picture 158
2. Add water, vinegar, sugar, salt, caraway seeds, dill and cook for 5 minutes.
Picture 160
3. In the meantime roast bacon on the pan with oil and add chopped onion (just to light brown colour).
Picture 157Picture 161
4. Add bacon and onion to the zucchini.
Picture 162
5. Thicken with fine shredded potato and cook shortly.
Picture 164

9.29.2010

Garlic spread

Picture 181
I used to prepare this spread for many years and usually in double or triple quantity than recipe ask for. We used to live in a small town in south Moravia region in Czech Republic and our friend used to come to visit us quite regularly – always on Saturday. She brought fresh loaf (or two) of bread and we were sitting and talking an eating till we ate everything. Then we were soooo full and in the odour of garlic felt to somnolence.
Here in Canada we have every last Thursday in month extended lunch break (always thematic). This Thursday garlic spread will be very much suitable and because it is not for the firs time we will enjoy the taste, we have some improvements as well: after we spread the garlic spread onto pieces of baguette or ciabatta we will put these pieces for couple of minutes to the oven – just to melt cheese inside and recover so a new dimensions of taste this garlic spread.

Ingredients:

10-15 cloves garlic
250g pot cheese
250g cream cheese
100g shredded cheese (mozzarella, cheddar or eidam)
3 tbsp mayonnaise
2 tbsp water, 2 tbsp vegetable oil, salt      

Directions:

1. Rub garlic with salt, add water and then oil and mix everything nice together.
 Picture 175Picture 176
2. Mix in a bowl (or mixer) pot cheese with cream cheese, and then add the garlic mixture from step 1.
Picture 177Picture 178
3. Add shredded cheese and mayonnaise and mix to finalize.
Picture 180

9.28.2010

Czech traditional bread

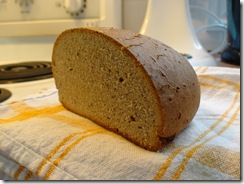
I can’t and I will not speak for everyone and on general level, but I have to confess that the first what my Czech taste buds abroad was craving for was Czech traditional bread with caraway seeds… In some bakeries (esp. in big cities) you can buy Swiss, German or Austrian versions of traditional European bread. No doubt this kind of breads are quite tasty, but the flavour is not 100% compliant… I tried many recipes at home and it took me a while until I got the classical taste, shape and quality… I would like to present to you today this recipe for the classical rye bread made without yeast. The preparation is not complicated, but you have to count with some extra time for the first time (to prepare starter) – about 4 more days. After that everything is very easy. Try please with me this recipe and I’m always very thankful for you comments and recommendation and experience.
 
DSC00897

Ingredients (starter) I.:

1/2 cup and 2 tbsp rye flour (divided – see directions)
1/2 cup and 2 tbsp lukewarm water (divided – see directions)

Directions (starter) I.:

1. In a taller glass (jar) mix 1/2 cup lukewarm water with 1/2 cup of rye flour (thin dough).
Picture 147
2. Cover with cloth and leave for 24 hours on warmer spot in the kitchen (optimum 25°C-30°C). In summer it is with no problems, in winter time the best place is oven with the light on – it creates ambient temperature).
3. The second and third day check the starter, mix it and add 1 tbsp of flour and 1 tbsp of water each day. You can “help” to start fermentation by adding little bit of water from Sauer kraut (raw, not pasteurized) or kéfir.
4. The four day is starter ready to be use. It is recommended always to keep a portion of the starter (add more flour and water) in the fridge and use it always when needed for the next runs. Usually I’m baking once a week my fresh bread, the starter last in the fridge up to 3 weeks – after that period of time (when is not used or reactivated) has to be prepared from scratch.
Picture 152

Ingredients (bread dough) II.:

1/2 cup starter
3 cups rye flour (divided – see directions)
2 cups wheat flour
2 cups water (divided – see directions – it is necessary to correct the final amount according the required consistency of bread)
2 tbsp salt
2 tbsp caraway seeds

Directions (bread dough) II.:

1. Always is the best time to start in the evening (approx. 7p.m.): in the bowl mix 1 cup of rye flour with 1/2 cup starter and 1 cup lukewarm water (thin dough). Cover with cloth and leave by the room temperature to rise over night.
2. Next day – in the morning (approx. 6:00a.m.): add to the mixture from step 1 other 2 cups of rye flour and 1 cup of warm water (approx. 35°C) and make thicker dough. Cover with cloth and leave by a little bit warmer temperature (best again oven with a light on) to rise until afternoon.
3. Same day – in the afternoon (approx 5p.m.) mix the dough from step 2 with 2 cups of wheat flour, 2 tbsp of salt and 2 tbsp of caraway seed and knead well.
Picture 153
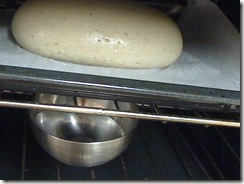
4. Make a loaf and place it on the baking paper on the baking tin. Smear with water and place it to the oven (with light on) together with a stainless steel bowl with warm water and let rise for 3 more hours.
 Picture 172

Picture 173
5. In about 8p.m. turn the oven on approx. 200°C (400°F) a bake for 60 minutes (the time is necessary to correct, because each oven is different) – until the bread get a nice brown-golden colour. Smear with water and cover with cloth and leave cool down over night.
Picture 174
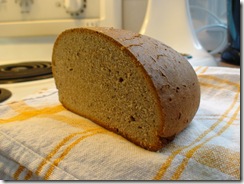
6. Next morning is a great crunchy bread ready for healthy breakfast or for sandwiches to go.
DSC00897

9.27.2010

Baked fish fillet with whipping cream and cheese

Picture 151
When I did my extensions at the university in Czech republic couple of years ago and when I deviated from the topic of Pharmaceutical Care to the topic of culinary, I got many times questions to characterise fifth flavour – umami. My answer was always quite prompt: “Do you know the feeling like bumb behind ears?” – that exactly is umami… It was discovered some years ago that glutamic acid and it’s sodium salt (mono sodium glutamate or MSG) are responsible for the characteristic umami taste. Contrary to popular opinion that MSG is bad for you I will say only one sentence: After all, our own body produces glutamic acid, a simple amino acid – necessary for any biochemistry process in each body… One classic said: “Well, people get sick for hating and gossiping while trying to enjoy the most delicious foods; then, they blame the MSG. However, I think that millions of people are bad for the food they consume. These people are miserable no matter what they eat. For them, even mineral water is poison.”
A typical control question if people claim their bad experience with MSG is if the same thing occurs when they eat tomatoes or parmesan… The level of glutamic acid found in parmesan cheese is 12 g/kg and the pulp of tomatoes on average contains 4.56 g/kg glutamic acid! Think about this when you sprinkle your food with parmesan. And if you ever wondered why Italian food tastes so nice, now you know that MSG is one reason (but of course not the only one …).
I will reveal a secret for you: for me personally synonym of umami is baked fish fillet with whipping cream and cheese… and it doesn’t contain MSG even! Try it please with me a share your comments.
 

Ingredients:

4 fish fillets (fresh or frozen)
1 lemon
250g shredded cheese (mozzarella, eidam, cheddar)
1 cup whipping cream
salt
 

Directions:

1. Fish filled salt and squeeze one lemon over the top.
 Picture 147
2. Add shredded cheese.
Picture 148
3. Cover with whipping cream.
Picture 149
4. Bake (not covered) in the oven 180°C (350°F) approx. 30 minutes – until it creates nice and crispy surface.
Picture 150

9.24.2010

Czech Brown Betty with Vanilla Curd

Picture 141
I did today a little research about grinders of Czech famous brand “Porkert”. I’m actually looking for popyseed grinder and universal grinder. Unfortunately the company with history over 130 years failed bankruptcy and the grinders are available only at collectors or as a Asian duplication, which is not what I’m looking for… This short introduction occurred to me in a context of another Czech brand Remoska (electric cooker – the best kept secret in the Czech Republic - everybody’s grandmother in the Czech Republic had one…) and I got two pieces, which I’m regularly using in my kitchen. For us, who are not cooking daily for 10+ people is the north American type of oven simply too big. Wicked tongues claims, that is because we need to bake 30lbs Thanksgiving turkey once a year and that is the reason, why we need such a big ovens… ha ha ha.
And one of the typical recipe for Remoska (but is is of course great for any type of pans or ovens) is Czech Brown Betty with Vanilla Curd. In the filling will be still missing grounded nuts, but I hope I will get somehow my Porkert UM75.


Ingredients:

some leftover breakfast rolls or buns (but it is easy and great to make it form e.g.blueberry bagels)
250g curd (from store or home made)
1 egg yolk
1 vanilla sugar
some slices of butter
1/2 cup milk
1 apple
raisins, (or dry cranberries, blueberries, cherries, nuts – anything what you will prefer)
pinch of ground cinnamon

Directions:

1. Slices of rolls or bagels dip into milk and place in pot inlaid with slices of butter.
Picture 132
2. Spread curd (mixed with egg yolk and vanilla sugar) on the layer of slices rolls or bagels.
Picture 133
3. Sprinkle with some dry fruits or nuts.
Picture 134
4. Make so many layers as the pot is full or from all remaining ingredients.
Picture 135Picture 136
5. The last layer can be sprinkle with shredded apple and ground cinnamon and some slices of butter. Bake 25 minutes in the oven - 180°C (350°F).
Picture 137

9.23.2010

Spaghetti with liver sausage

Picture 146
This recipe is one of my first – actually - from the school-boy-time, when I started to experiment in the kitchen. But what is as well very interesting on this particular recipe – it was published in 1989 in one of the famous Czech gardeners-handymen-culinary magazine “Receptar”. The magazine was a part of the famous Saturday night TV show on the same topics and my recipe won some school-kids competition in culinary… ha ha ha… I was very proud of myself and proud of my recipe and my award…
What is truth – I never repeat the recipe – until last night… After 21 years and in a different kitchen and under different circumstances I did my Spaghetti with liver sausage again… Here is the recipe, try it please and let me know, how did it go. Thank you and Bon Appétit!

Ingredients:

1 onion (chopped)
1 fine liver suasage
1 tomato pureé
1 tbsp sugar
3 cloves garlic (minced)
salt, pepper
2 tbsp shredded cheese

Directions:

1. Roast onion in the pan (until light brown).
Picture 142
2. Add liver sausage and let melt (approx. 2 minutes).
Picture 143
3. Add tomato pureé into the mixture and cook for 2 more minutes.
 Picture 144
4. Add sugar, salt, pepper and garlic for nice and smooth taste, serve on the top of boiled spaghetti and sprinkle with shredded cheese.
Picture 145

9.22.2010

Scrambled eggs, which changed my world

Picture 139

Ingredients:

4 eggs
1/4 cup butter
salt, pepper and chives

Directions:
1. Separate yolks from whites (THAT IS THE TRICK).
2. Melt piece of butter in the pan – when butter becomes foamy, slightly caramelized and start smell, add egg whites and let them totally coagulate (until all liquid is gone).
3. In this moment add egg yolks and serve (for those of you who like running egg yolk), otherwise cook them for one more minute.
Picture 138
4. Now add some salt, pepper and chives for taste and decor.

9.20.2010

Lobster Mushroom with garlic

Great and easy recipe form North American cuisine.
DSC01044

Ingredients:

1lb Lobster mushroom (Hypomyces lactifluorum)
3 tbsp vegetable oil
5 cloves garlic
1/4 cup butter

Directions:

1. Clean and slice Lobster Mushroom.
Picture 117Picture 118
2. Slice garlic as well.
Picture 119
3. Mix everything with oil and let roast in a pan for approx. 20 minutes till almost all liquid evaporate.
Picture 120
4. In the end add 1/4 cup of butter and let melt, but not overburn (just about 5 minutes).
Picture 121     
5. Serve with rice and delicious white wine.
DSC01044

9.19.2010

Czech traditional filled buns

Great and easy recipe from my sister-in-law Olinka from Podebrady. As my brother Lukas says about them: “there is nothing in it (after longlife  experience and several years of titration) best buns so far -  soft, smooth and at that firm, too; best the second day third gone”. So, my dear friends, try it! Picture 115      

Ingredients I. (ferment):

1 tbsp dry baking yeast
1 cup lukewarm milk
pinch of sugar
1 tbsp flour


Directions I.:

Mix all ingredients in measuring glass or deeper bowl and let arise (about 20 min.).


Fillings:

Pot cheese filling:

Mix 250g home made pot cheese (see recipe on the blog) with some vanilla extract and 2 tbsp sugar and 1 egg yolk (raisins previously soaked in spice rum and dry can be added as well).

Popyseed filling:

Ground popyseed infuse in milk with sugar and thicken with cheese cake crumbs.

Plum butter filling:

Mix 200g plum butter (see recipe on the blog) with 1 tbsp of spice rum and some ground lemon peel.

Ingredients II. (dough):

3 cups flour
100g sugar
100mL vegetable oil
2 egg yolk
pinch of salt
ferment

Directions II.:

1. Mix ferment, flour, egg yolk, oil and pinch of salt in a bowl or KitchenAid.
Picture 27
2. Knead nice, smooth and elastic dough, let it raise for an hour.
Picture 28
3. Knead once again and Split dough into about 80g buns, make a flat round with a hand.
 Picture 109
4. Fill with filling (pot cheese, popyseed or plum butter) – depends on taste.
 Picture 110
5. Close carefully and put them to the baking pan (wiped with oil) tight side by side close side down.
 Picture 111 Picture 112
6. Let the buns raise for 10 more minutes, smear with oil and bake in the oven 180°C (350°F) for 25 minutes.
 Picture 113
7. Finished buns smear with oil once again.
Picture 114